How to configure a MikroTik router step by step
This post is for those that want to know how to configure a MikroTik router; step by step. It is important to understand what must be done to successfully install a MikroTik router for internet access.
There are seven basic configuration requirements that must be met on a MikroTik router to provide internet access to all connected users. These tasks, some of which are not compulsory, are listed below and will be looked into one after the other.
- Assign system identity
- Username and password
- Assign IP addresses
- Default gateway
- DHCP
- NAT
How to configure a MikroTik router
System Identity
System Identity is to MikroTik what hostname is to Cisco. Configuring system identity is part of the administrative configuration and is not compulsory. This is not part of the requirement to connect a router to the internet but is recommended especially when managing multiple routers. It allows an administrator easily identify a router.
To assign a MikroTik router an identity, simply enter the commands below.
/system identity set name=know.al
Username and password
Though not compulsorily required to connect a router to the internet, it highly recommended for the security of your network and network device. MikroTik routers have default username as admin with no password. Users are advised to change these settings.
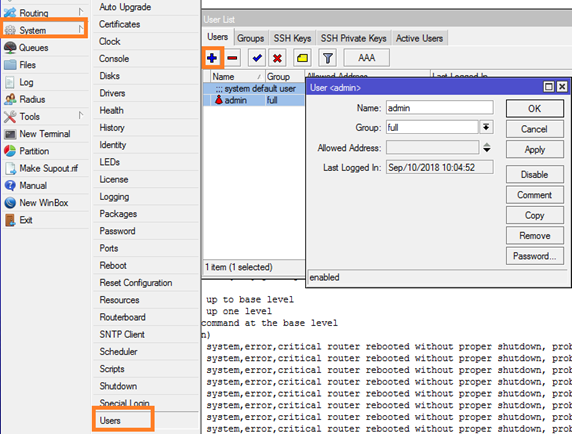
To change username, click on system>>users>>double click on the admin user and change username from admin to something else. See image below.
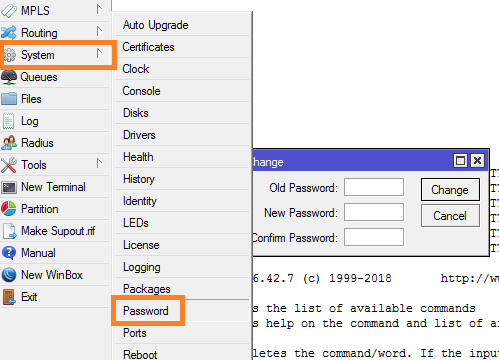
To set system password, click on system>>password>>leave the space for old password blank and enter new password twice.
Assign IP addresses
At the most basic level, two IPs are required on the router to successfully connect users behind a Mikrotik router to the internet. These are the WAN and LAN IPs. Before the assignment of IPs, the WAN and LAN interfaces must have been chosen. In most cases, the ISP connection goes to ether1 while the LAN connection is plugged to ether2. If the ISP has dhcp enabled, then the ether1 on the Mikrotik can be configured as a dhcp client, otherwise, an IP will be configured manually. See here for how to configure a Mikrotik router interface as a dhcp client.
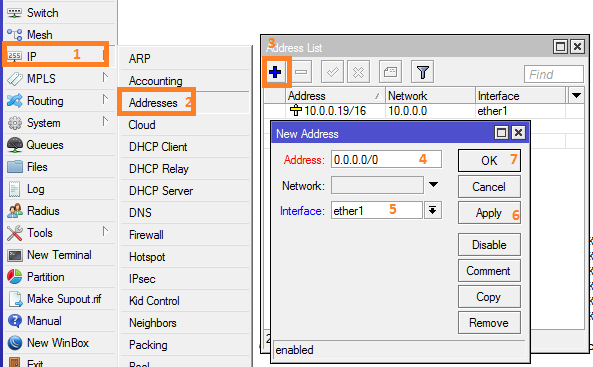
To assign an IP address manually, click on IP>>address>>add>>enter address and subnetmask.
Default gateway
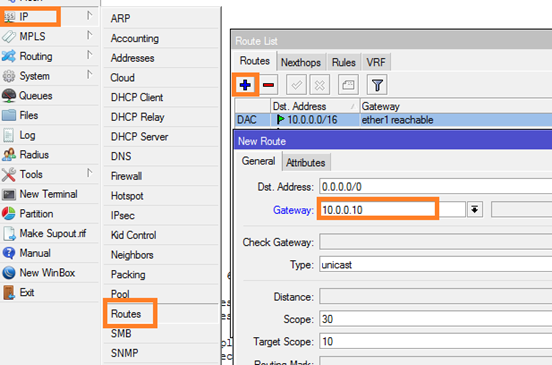
The router must be assigned a default gateway, also known as default route, to get to destinations beyond the ISP’s network. To configure a default route on Mikrotik, click on IP>> route>> enter gateway to destination 0.0.0.0/0.
Configure dhcp server
In most cases, a dhcp server will be required to help lease out IP addresses to connected users. Without a dhcp server, assignment of IPs can become a fulltime job, and if not properly done, there will IP conflicts.
Before you configure a dhcp-server make sure that:
- The interface where the dhcp server will be configured has to have an available IP Address within the subnet that will be allocated.
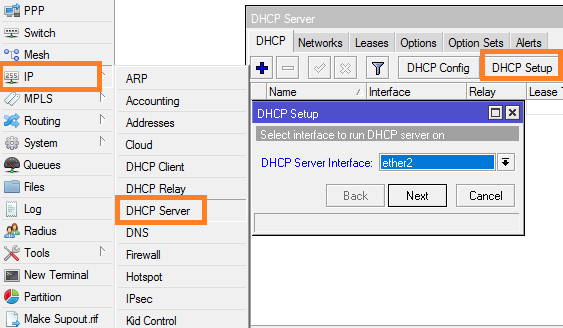
- In the first step of configuration just like it’s suggested below, select the interface where you have configured the IP Address.
- Dhcp Server can’t be configured in an interface that’s part of the bridge. In this case the configuration of IP Address and Dhcp Server has to be done on the bridge.
To configure a dhcp server on a Mikrotik router, click on IP>>dhcp server>>dhcp setup and follow through.
NAT
Nat configuration is required for systems on the LAN to have access to the internet. It allows packets source IPs to be masqueraded with the public IP on the Mikrotik router as they exit the router via the WAN interface to the internet. To configure NAT on a Mikrotik simply enter the commands below.
/IP firewall nat
add chain=srcnat in-interface=ether2 out-interface=ether1 action=masquerade